⚡ Module 10: Autonomous Event Triggers
Codename: OPERATION NIGHT WATCH
Time: 30 minutes
Scenario: Auto-Escalate High-Priority Tickets
🎯 Learning Objectives
By the end of this module, you will be able to:
- Explain what event triggers are and when to use them
- Create an event trigger that watches the Tickets SharePoint list
- Filter the trigger for specific conditions (high-priority tickets)
- Have Bit send an escalation automatically, with no user interaction
- Understand the difference between conversational and autonomous agents
🧭 Overview
Until now, Bit has been reactive — he waits for a user. In this module you'll make him autonomous: the moment a High or Critical ticket lands in the Tickets list, Bit escalates it to the IT lead — no one has to ask.
Crucially, this watches the same Tickets list Bit already writes to in smart-triage (Module 07). One ticket store, end to end — a ticket Bit logs can immediately trigger an escalation.
🧩 What Are Event Triggers?
Event triggers activate the agent based on events, not user input:
| Event Type | When It Fires | Example |
|---|---|---|
| SharePoint item added/modified | A list item is created or changed | Escalate a new high-priority ticket |
| Dataverse row added/modified | A record is created or updated | React to a new record |
| Schedule | A time or recurrence | Daily summary at 9 AM |
| Webhook | An external system signals | Process an incoming order |
Conversational vs. Autonomous Agents
| Conversational | Autonomous |
|---|---|
| Waits for user input | Acts on events |
| Triggered by a message | Triggered by data changes, schedules, webhooks |
| Responds in chat | Sends notifications, creates records, updates systems |
| Bit answering an employee | Bit escalating a high-priority ticket on its own |
After this module, Bit is both conversational and autonomous.
🎬 The Scenario: Auto-Escalate High-Priority Tickets
The autonomous flow:
- A new ticket is created in the Tickets list (by
smart-triage, or by anyone). - If Priority is High or Critical, Bit:
- reads the ticket details, and
- emails the IT lead to escalate.
All of it happens automatically.
🧰 Prerequisites
- The Tickets SharePoint list from Module 00 (the same one
smart-triagewrites to in Module 07). - The Office 365 Outlook connection from Module 07.
- A mailbox to receive escalations (use your own for testing in place of the IT lead).
🏫 In the facilitated workshop, the Tickets list and connections are pre-provisioned. If you're at the office, complete Module 00 and Module 07 first.
🧪 Lab 10.1: Build the Autonomous Trigger (a Workflow on the Tickets List)
Objective: A workflow that fires the moment a new item lands in the Tickets list.
🆕 How autonomy works here. There's no separate "Triggers" block on the agent — Bit's Build page has Instructions, Skills, Tools, Knowledge, Connected agents, and Memory. Autonomous behavior lives in a Workflow whose trigger is an event (a SharePoint item being created) instead of "When an agent calls the flow." You build it just like Module 09 — only the trigger type differs.
Step 1: Create the Workflow and Pick the Trigger Type
- Go to https://copilotstudio.microsoft.com → Workflows (left nav) → New Workflow. This opens the workflow designer.
- Select the trigger node, and for Trigger type choose Connector ("Trigger from an external service").
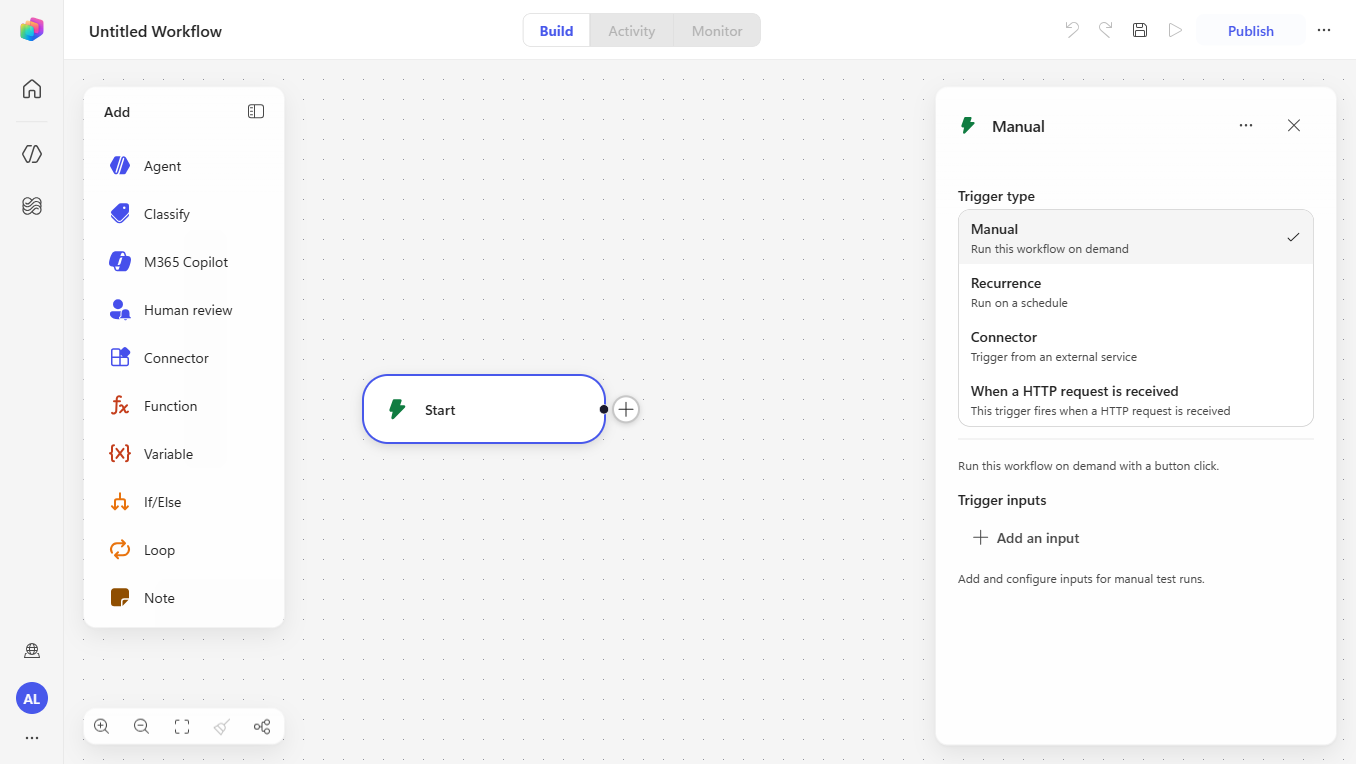
The four trigger types: Manual (run on demand), Recurrence (a schedule), Connector (an external service — what we want), and When a HTTP request is received.
Step 2: Point It at the Tickets List
- For the connector trigger, choose SharePoint → When an item is created.
- Configure it:
- Connection (required) — sign in / pick your SharePoint connection. Set this first: a missing connection shows as "1 error" and blocks Publish. Once it's green, the dropdowns below populate.
- Site Address — your IT Help Desk site (the recruits site).
- List Name — Tickets.
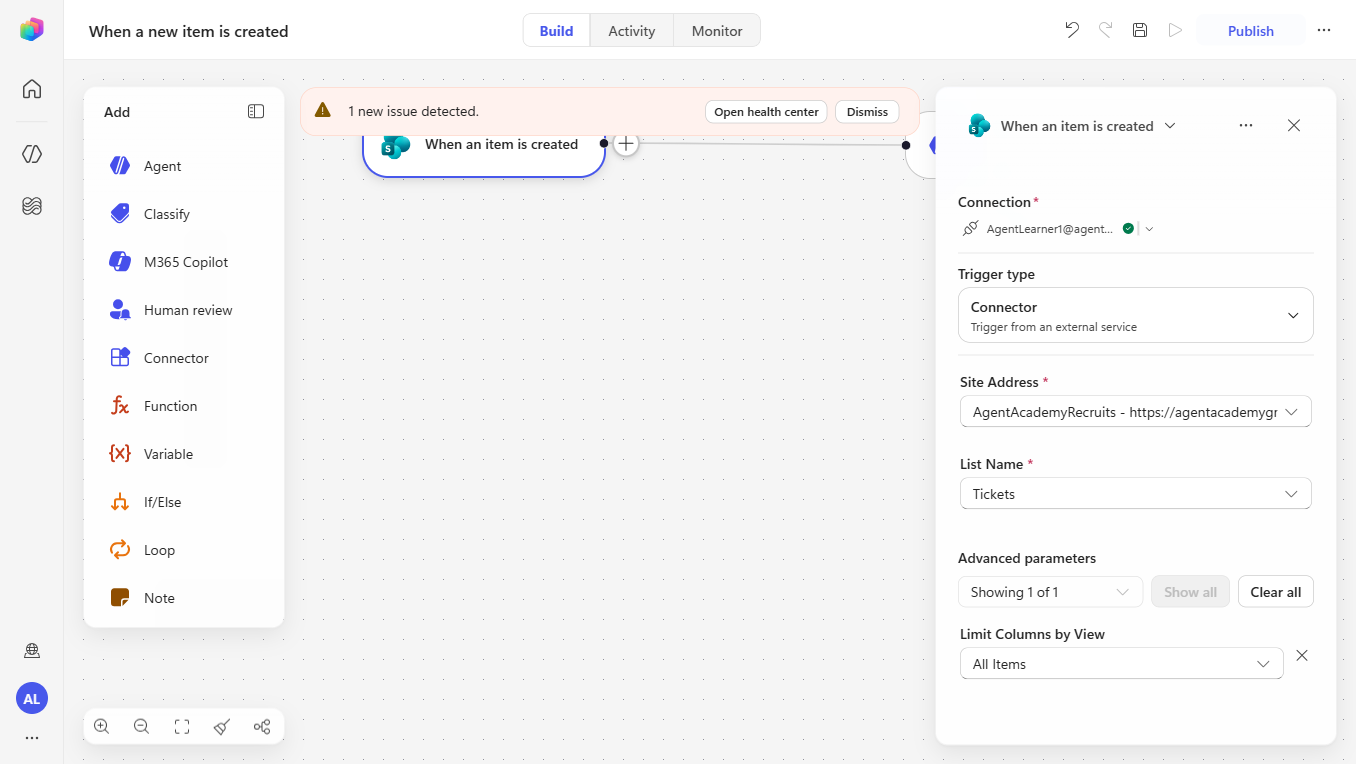
Step 3: Filter for High/Critical (If/Else)
The SharePoint trigger fires for every new item, so branch right after it — the same If/Else you used in Module 09:
- Add an If/Else (Condition) step after the trigger.
- Condition: the trigger's Priority field is equal to
HighorCritical. Keep the escalation in the "true" branch. - Name the workflow (top-left):
Escalate High Priority Ticket, then Save.
✅ Checkpoint: The workflow runs on every new Tickets item and only proceeds to escalate for High/Critical.
🧠 The trigger exposes the item's fields (Title, Description, Priority, Category, Requestor) — you'll map these into the escalation email next.
🧪 Lab 10.2: Send the Escalation Email
Objective: In the High/Critical ("true") branch, email the IT lead with the ticket details.
- Inside the If/Else true branch, + Add a step → Connector → Office 365 Outlook → Send an email (V2).
- Map the values from the trigger's item (Title, Priority, Category, Requestor, Description).
Escalation email:
| Field | Value |
|---|---|
| To | itlead@contoso.com (use your own address for testing) |
| Subject | 🚨 High priority ticket: <ticket title> |
| Body | ticket title, priority, category, requestor, and the description |
A high-priority ticket needs attention:

Ticket: <title>
Priority: <priority>
Category: <category>
Requestor: <requestor>

Description:
<description>

Auto-escalated by Bit, the Contoso Helpdesk Agent.
✅ Checkpoint: A High/Critical ticket triggers an escalation email to the IT lead.
🧪 Lab 10.3: Test the Trigger
Objective: Create a high-priority ticket and confirm the escalation fires.
Option A: Let Bit create it (end-to-end)
Preview → new chat → describe a fully-blocking issue and ask Bit to log a ticket:
textOur whole team can't reach the production database — everyone is blocked. Please log a ticket.smart-triagesets Priority = Critical and writes the row. The trigger sees a Critical ticket and fires the escalation.
Option B: Add a row directly
- Open the Tickets list in SharePoint → + New:
- Title:
Production database unreachable - Priority: Critical
- Category:
Network - Requestor:
you@contoso.com
- Title:
- Save the row.
Verify
- Check the IT lead mailbox (your test address) for the escalation email with the ticket details.
✅ Checkpoint: A High/Critical ticket — whether logged by Bit or added by hand — auto-escalates to the IT lead.
🪂 Fallback and Notes
⚠️ Facilitator note. If the SharePoint "When an item is created" connector trigger isn't available (or you can't make a SharePoint connection) in your tenant, switch the trigger type to Recurrence and have the workflow scan the Tickets list for new High/Critical items every few minutes instead. The teaching point — the agent acts on an event without a user — is identical. Confirm the available path before the workshop.
🔁 Avoid double-sends. If you trigger on both created and modified, a later edit to the same ticket can re-fire. Trigger on created only, or add a guard (e.g., only escalate when Status = New).
🚀 Advanced Event Trigger Scenarios
- Scheduled triggers — every morning at 9 AM, summarize the previous day's tickets and email the IT lead.
- Webhook triggers — react to an external system (e.g., a monitoring tool posts an alert).
- Multi-condition triggers — escalate only when Priority = High and Status is still New after a set time (overdue).
🧠 Key Takeaways
- Event triggers make agents autonomous — they act without user input
- One ticket store — Bit watches the same Tickets list he writes to (no separate table)
- Filter to what matters — only High/Critical tickets escalate
- Trigger data — the new item's fields feed the escalation
- Guard against double-sends — trigger on created, or check Status
🏗️ What You've Built
Bit is now:
- ✅ Conversational — answers, resets passwords, logs tickets, runs approvals (Modules 06–09)
- ✅ Autonomous — watches the Tickets list and auto-escalates High/Critical items (Module 10)
⏭️ Next Steps
In Module 11: Evaluate, Publish, Share & Monitor, you'll prove Bit is reliable with an evaluation set, then publish him to Microsoft Teams and Microsoft 365 Copilot, share him, and watch usage on the Monitor tab.
Course Navigation: ← Module 09 | Course Index | Next: Module 11 →