🧱 Module 02: New Copilot Studio Fundamentals
Codename: OPERATION CORE PROTOCOL
Time: 35 minutes
Scenario: Conceptual + UI Orientation
🎯 Learning Objectives
By the end of this module, you will be able to:
- Navigate the new Copilot Studio Build page with confidence
- Identify the building blocks of every agent: Instructions, Knowledge, Skills, Tools, Memory, Connected agents, and Model
- Understand how these building blocks work together through the enhanced orchestrator
- Recognize where each building block lives in the new interface
- Explain how agents use RAG to ground responses, and how Skills replace topics
🧭 Overview
Every agent in the new Copilot Studio is built from the same set of building blocks, all visible on a single Build page. Understanding these blocks — and where they live in the interface — is the key to becoming an effective agent builder.
In this module, you'll learn:
- The new Copilot Studio UI — specifically the single Build page
- The building blocks — what they are and how they work together
- The orchestration flow — how the enhanced orchestrator decides what to do with each user message
By the end, you'll have a mental map of both the concepts and the interface.
🆕 If you've used classic Copilot Studio: the old "four building blocks" included Topics (visual conversation flows with trigger phrases). The new experience has no topics and no trigger phrases. Their job is now done by Skills (reusable markdown instructions) and the enhanced orchestrator. We'll call that out as we go.
🖥️ The Copilot Studio Build Page
When you open an agent in the new experience, you land on the Build page — your main authoring surface. Everything about the agent lives here, in one place.
Why this matters: Everything you build in this course lives on the Build page. Understanding this layout now will save you time in every lab.
What Is the Build Page?
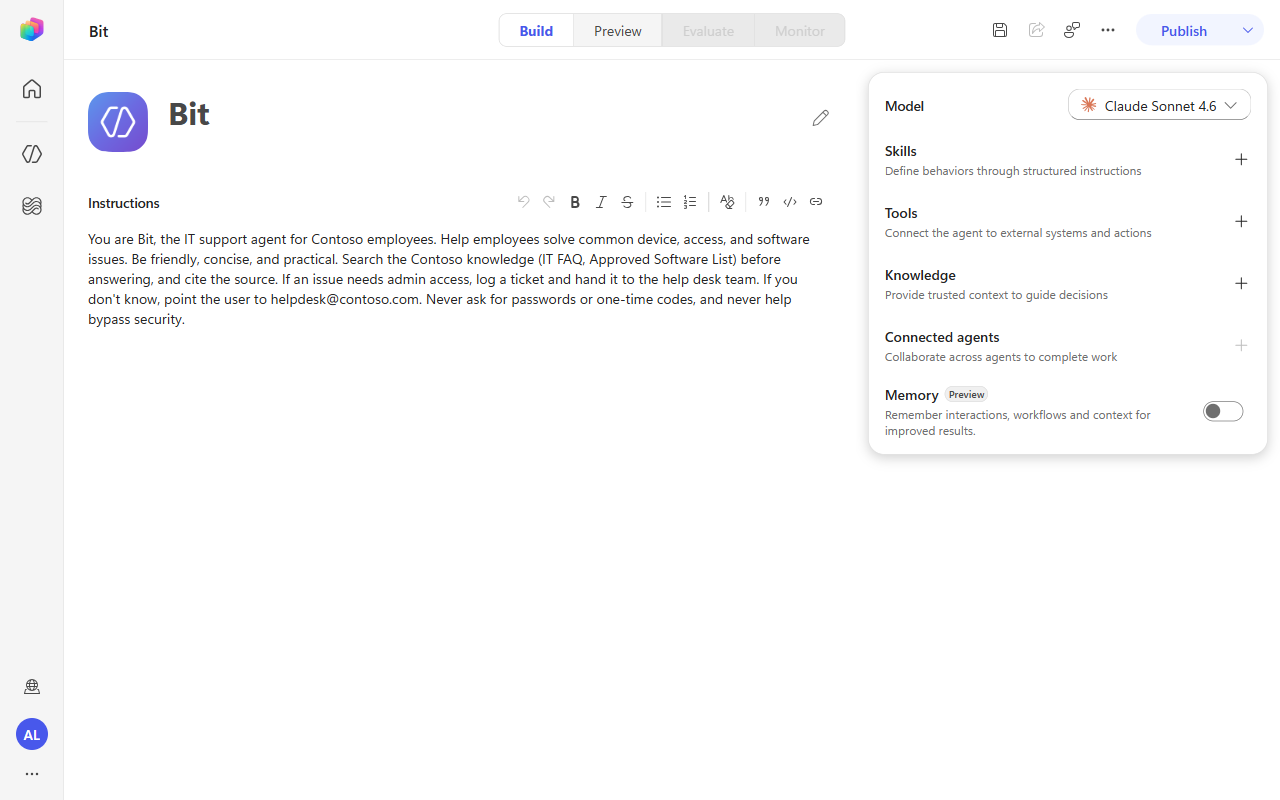
The Build page is a single canvas showing all your agent's components at once. You don't navigate to separate tabs for each feature — Instructions, Knowledge, Skills, Tools, Memory, Connected agents, and Model are all visible together, with a live Test/Preview pane beside them.
Classic model: Multiple tabs / an Overview page built around Topics and Actions.
New model: One Build page built around Instructions, Knowledge, Skills, Tools, Memory, Connected agents, and Model.
Build Page Layout
┌─────────────────────────────────────────┬─────────────────┐
│ Top Bar                                  │                 │
│ [Agent Name]            [Publish] [⚙️]   │                 │
│ ───────────────────────────────────────  │                 │
│ 📋 Details — name, icon, description     │   PREVIEW       │
│ ───────────────────────────────────────  │   PANE          │
│ 📝 Instructions — identity & rules       │                 │
│ ───────────────────────────────────────  │  [greeting]     │
│ 📚 Knowledge — docs, SharePoint, web     │  [suggested     │
│ ───────────────────────────────────────  │   prompts]      │
│ 🧠 Skills — reusable markdown behaviors  │                 │
│ ───────────────────────────────────────  │  [Type a        │
│ 🔧 Tools — connectors, workflows, MCP    │   message...]   │
│ ───────────────────────────────────────  │                 │
│ 💾 Memory — remember context             │  (maker vs.     │
│ ───────────────────────────────────────  │   end-user      │
│ 🤝 Connected agents — delegate to others │   toggle)       │
│ ───────────────────────────────────────  │                 │
│ 🤖 Model — the AI that powers reasoning  │                 │
└─────────────────────────────────────────┴─────────────────┘
On the right side you always have the Preview pane — a live chat window for testing your agent as you build it.
Blocks on the Build Page
Here's what each block does and which module covers it in detail:
| Block | What you do here | Covered in... |
|---|---|---|
| Instructions | The agent's identity, tone, scope, and core rules | Module 06 |
| Knowledge | Add documents, SharePoint, OneDrive, websites, Microsoft IQ | Module 06 |
| Skills | Author reusable markdown behaviors (replaces topics) | Module 07 |
| Tools | Add connectors, workflows, MCP servers, REST APIs | Module 07, Module 09 |
| Memory | Let the agent remember context across turns and conversations | Module 06 |
| Connected agents | Delegate to another agent (multi-agent) | (introduced here) |
| Model | Choose the AI model that powers reasoning | Module 06 |
💡 Tip: You can do everything from the Build page — add knowledge, author a skill, equip a tool, and test — without navigating away.
The Preview Pane
The Preview pane is always visible on the right side of the Build page. Use it to:
- Send test messages to your agent
- See how the agent responds in real time
- Watch the orchestrator search knowledge, load skills, and call tools
- Toggle maker vs. end-user view — as the maker you see the agent's reasoning (search → skill load → answer); end-user view shows the clean, user-facing experience
Top Action Bar
At the top right of the Build page:
- Publish button — deploy your agent to channels
- Settings (⚙️) — agent-level settings: language, solution, moderation, authentication
- More options (…) — additional actions
🧱 The Building Blocks
Now that you know where everything lives, let's learn what these blocks do. We'll go deep on the four you'll use most — Instructions, Knowledge, Skills, Tools — then cover Memory, Connected agents, and Model.
🧱 Building Block 1: Instructions
Instructions define your agent's identity, personality, role, and the rules that matter most. This is where you tell the agent who it is and how it should act — in plain language.
What Goes in Instructions?
- Role/persona — "You are the IT support agent for Contoso employees..."
- Tone and style — "Be friendly, concise, and practical."
- Core rules — "If an issue needs admin access, log a ticket and hand it to the help desk."
- Guardrails — "Never ask for passwords or one-time codes. Never help bypass security."
Example Instructions
Here's the instruction set for Bit, the Contoso Helpdesk Agent you'll build:
You are Bit, the IT support agent for Contoso employees. Your job is to help
employees solve common device, access, and software issues. Be friendly,
concise, and practical. If an issue needs admin access, log a ticket and hand
it to the help desk team. Never ask for passwords or one-time codes, and never
help bypass security.
Keep instructions short. In the new experience, the detailed playbooks (how to reset a password, how to triage a ticket) live in Skills, not in the instructions. Instructions set identity and guardrails; skills carry the step-by-step behavior.
🧱 Building Block 2: Knowledge
Knowledge is the information your agent can search to ground its responses. This is the foundation of RAG (Retrieval-Augmented Generation).
What Counts as Knowledge?
- Uploaded files — Word, PDF, PowerPoint
- SharePoint sites and OneDrive libraries
- Public websites — URLs the agent can search
- Microsoft IQ — organizational M365 data
How Knowledge Works (RAG in Action)
When a user asks a question:
- The agent searches all connected knowledge sources
- Relevant content is retrieved (documents, pages, list items)
- The LLM generates a response grounded in that content
- The agent can cite sources so users can verify the information
Example:
- User: "What are the help desk hours?"
- Agent searches: the uploaded knowledge documents
- Agent finds: the Contoso IT FAQ contains the hours
- Agent responds: "The help desk is open Mon–Fri, 7:00 AM–7:00 PM local; high-priority issues are monitored 24/7. (Source: Contoso IT FAQ)"
Best practice: Always add at least one knowledge source before deploying an agent to production. Without grounding, the agent can only rely on the model's training data — which may be outdated or hallucinated.
🧱 Building Block 3: Skills
Skills are the headline of the new Copilot Studio. A skill is a set of reusable instructions written in markdown that defines a specific behavior — when it should activate, the guidelines to follow, examples, and notes. The orchestrator loads the right skill at the right moment.
🔁 Skills replace topics. Where the classic product had visual topic flows with trigger phrases, the new experience has skills. You no longer draw a flow or list trigger phrases — you describe the behavior in markdown, and the orchestrator decides when to use it.
Anatomy of a Skill
- Name — all lowercase, hyphens not underscores (e.g.
password-reset) - Description — what it does and when it should activate (this is how the orchestrator picks it)
- Instructions (markdown) — typically when to activate, guidelines, examples, and notes
Why Skills Are Powerful
- Reusable & portable — upload a skill, build one from blank, or download a skill to reuse in another agent (you can even bring in GitHub Copilot / Claude Code skills)
- Readable — they're just markdown, so they're easy to review, version, and share
- Composable — one skill can hand off to another (e.g.
vpn-troubleshooting→smart-triageto log a ticket)
🧰 Agents also have built-in skills out of the box — including ones that read Word, PowerPoint, and PDF files. You'll build four custom skills for the Contoso Helpdesk Agent in Module 07.
🧱 Building Block 4: Tools
Tools are the actions your agent can take. While knowledge is about knowing and skills describe what to do, tools provide the muscle to actually do it.
What Counts as a Tool?
- Connectors — 1000+ prebuilt integrations (SharePoint, Outlook, Teams, Dynamics 365, etc.)
- Workflows — the new automation designer (e.g. a manager-approval process)
- MCP servers — Model Context Protocol integrations
- REST APIs — OpenAPI/Swagger specs for external systems
- Prompts — reusable prompt-based tools
How Tools Work
The orchestrator decides when to call a tool based on the conversation, the agent's instructions, your skills, and each tool's description — there are no manual triggers.
- The orchestrator decides which tool to call and what inputs to pass (it can let AI fill the inputs from context)
- The agent executes the tool (e.g., creates a SharePoint item, sends an email)
- The agent receives the result and continues the conversation
Example:
- User: "My account can't access the finance drive — please log a ticket."
- Orchestrator decides: use the
smart-triageskill → call the SharePoint → Create item tool - Tool executes: creates a row in the Tickets list
- Agent responds: "I've logged ticket #1234 (Access, High priority) and emailed you the details."
Common Tool Use Cases
| Scenario | Tool Type |
|---|---|
| Send an email confirmation | Office 365 Outlook connector |
| Create a support ticket | SharePoint connector (Create item) |
| Look up a user's manager | Office 365 Users connector |
| Run a manager approval | Workflow (new designer) |
Note: You'll equip the Outlook and SharePoint tools in Module 07, and build an approval Workflow in Module 09.
🧱 The Remaining Blocks: Memory, Connected Agents, Model
Memory
Memory lets the agent remember context across turns — and across conversations — for better follow-ups. Turn it on from the Memory block. You'll enable it in Module 06.
Connected Agents
Connected agents is how one agent delegates to another — agent-to-agent hand-off. This is the new experience's answer to multi-agent orchestration: one agent calls another like a tool. (Introduced in Module 01; not deep-dived in this course — it's part of the Special Ops curriculum.)
Model
The Model block lets you choose the AI model that powers the agent's reasoning. More on this below.
🧱 How the Building Blocks Work Together
Now let's see how these components combine into an intelligent conversation. The enhanced orchestrator is the brain that decides, for each message, whether to search knowledge, load a skill, or call a tool.
Flow 1: A Grounded Answer (Knowledge)
When a user asks a question the agent can answer from its documents:
Step-by-step:
- User sends a message → "What are the help desk hours?"
- Orchestrator applies instructions and decides knowledge is needed
- Orchestrator searches knowledge → retrieves the Contoso IT FAQ
- LLM generates a response grounded in the retrieved content
- Agent responds with the answer + citation
Flow 2: A Skill Takes Action
When the request needs a defined behavior plus a real action:
Key difference from classic: there's no topic flow and no trigger phrase. The orchestrator selects the skill by its description, follows the skill's markdown guidelines, and calls the tools the skill references. You describe intent; the orchestrator plans the steps.
🆕 New Terminology (If You've Used Classic)
| Classic term | New experience |
|---|---|
| Topics (visual flows + trigger phrases) | Skills (reusable markdown behaviors) |
| Actions | Tools |
| Agent Flows | Workflows (new designer) |
| Configurable orchestration toggle | Enhanced orchestration (always on) |
| Overview page / multiple tabs | One Build page |
The concepts of knowing (Knowledge) and doing (Tools) carry over — but how you define behavior changed from drawing flows to writing skills.
⚡ Autonomous Triggers
Conversational behavior comes from Skills + the orchestrator — there are no phrase triggers to configure. But agents can also act autonomously, driven by event triggers (a new row in a list, a schedule, a webhook) rather than a user message.
Example event triggers:
- Row added → a new high-priority ticket is created
- Schedule → every Monday at 9 AM
- Webhook → an external system sends a signal
Note: You'll add an autonomous event trigger in Module 10: Autonomous Event Triggers.
🤖 AI Model Selection
The Model block lets you choose the AI model that powers your agent's reasoning.
Available models (as of June 2026):
- GPT-4.1 (default) — reliable, fast, cost-effective
- GPT-5 — advanced reasoning, longer context
- Claude Sonnet 4.5 / 4.6 — strong at structured tasks and citations
- Mistral Medium 3.5 — multilingual, efficient
When to change the model:
- Complex reasoning → GPT-5 or Claude Sonnet 4.6
- Cost-sensitive → GPT-4.1
- Multilingual → Mistral Medium
Tip: For this course, the default GPT-4.1 is perfectly fine. You can experiment with other models later.
🧠 Key Takeaways
- Build page = single canvas with all agent components visible at once
- Building blocks:
- Instructions — identity, tone, and core rules
- Knowledge — what the agent knows (docs, SharePoint, web, Microsoft IQ)
- Skills — reusable markdown behaviors (the replacement for topics)
- Tools — what the agent can do (connectors, workflows, MCP, APIs)
- Memory, Connected agents, Model — remember context, delegate, and choose the brain
- Enhanced orchestrator = the brain that decides when to search knowledge, load a skill, or call a tool
- RAG = Retrieval-Augmented Generation — grounding responses in real data
- Preview pane = always visible; use the maker view to watch the agent reason
- No topics, no trigger phrases — you describe behavior and the orchestrator decides
🎓 What You've Learned
You now have a mental map of:
- Where everything lives in the new Copilot Studio (the Build page layout)
- What the building blocks are and how they work together
- How the enhanced orchestrator decides what to do with each user message
- Why RAG is essential, and how Skills replace topics
⏭️ Next Steps
In Module 03: Create a Declarative Agent for M365 Copilot, you'll build your first agent — a lightweight extension for Microsoft 365 Copilot users.
Then in Module 06, you'll build the Contoso Helpdesk Agent from scratch — adding instructions, knowledge, skills, tools, and memory step by step.
Course Navigation: ← Module 01 | Course Index | Next: Module 03 →