📦 Module 04: Creating a Solution
Codename: OPERATION QUARTERMASTER
Time: 15 minutes
Scenario: Solution Packaging and ALM
🎯 Learning Objectives
By the end of this module, you will be able to:
- Explain what a Power Platform solution is and why it matters
- Create a solution publisher with proper naming conventions
- Create a new solution in the Power Apps maker portal
- Set a preferred solution in Copilot Studio
- Understand how solutions support Application Lifecycle Management (ALM)
🧭 Overview
Before you build Bit (the Contoso Helpdesk Agent), you need to set up a solution — a container that organizes all your agent components (agents, workflows, connections, etc.) for proper lifecycle management.
Think of a solution as a "project folder" for Power Platform components. Without a solution, your agents and workflows exist as loose, unmanaged components. With a solution, you get:
- ✅ Organization — all related components in one place
- ✅ Version control — track changes over time
- ✅ Environment promotion — move from dev → test → production
- ✅ Team collaboration — multiple builders working on the same solution
- ✅ Backup and restore — export solutions as portable packages
In this module, you'll create a solution called Contoso Helpdesk Agent that will hold all the work you do in the rest of the course.
🧰 Prerequisites
- A Power Apps Developer environment (created in Module 00).
- Access to the Power Apps maker portal (make.powerapps.com).
🏫 In the facilitated workshop, your environment and security are already provisioned — you'll create the solution here as part of Mission #2. If you're following along at the office, complete Module 00 first.
🧩 What Is a Solution?
A solution is a container for Power Platform components. It acts as a packaging and deployment mechanism for:
- Copilot Studio agents
- Workflows (the new automation format) and cloud flows
- Connectors and connection references
- Dataverse tables (if you create custom data structures)
- Environment variables
Managed vs. Unmanaged Solutions
| Solution Type | When to Use | Can Edit? |
|---|---|---|
| Unmanaged | Development environment | ✅ Yes — active workspace |
| Managed | Test, production environments | ❌ No — read-only, deployed package |
Workflow:
- Build in an unmanaged solution (dev environment)
- Export as a managed solution (packaged .zip file)
- Import to test/production as a managed solution (locked, production-ready)
For this course, you'll work in an unmanaged solution. Exporting and deploying to production is covered in advanced ALM training.
💡 Why Solutions Matter
Imagine you build 10 agents over the next year without solutions. Here's what happens:
- ❌ No organization — agents and workflows are scattered across the environment
- ❌ No backup — if you accidentally delete an agent, it's gone
- ❌ No promotion — you can't easily move agents from dev to production
- ❌ No collaboration — teammates can't tell which components belong together
With solutions:
- ✅ Everything is packaged — export the solution, import it elsewhere
- ✅ Clear ownership — you know which components belong to which project
- ✅ ALM-ready — move to CI/CD pipelines (Azure DevOps, GitHub Actions) when you're ready
📢 Lab 4.1: Create a Solution Publisher
Every solution has a publisher — a namespace that identifies who created the solution. Think of it like a company or team name.
Step 1: Open the Power Apps Maker Portal
- Go to https://make.powerapps.com
- Sign in with your M365 account
- Select your developer environment from the environment picker (top right)
Step 2: Navigate to Solutions
- In the left navigation, select Solutions
- You may see a list of existing solutions (if any)
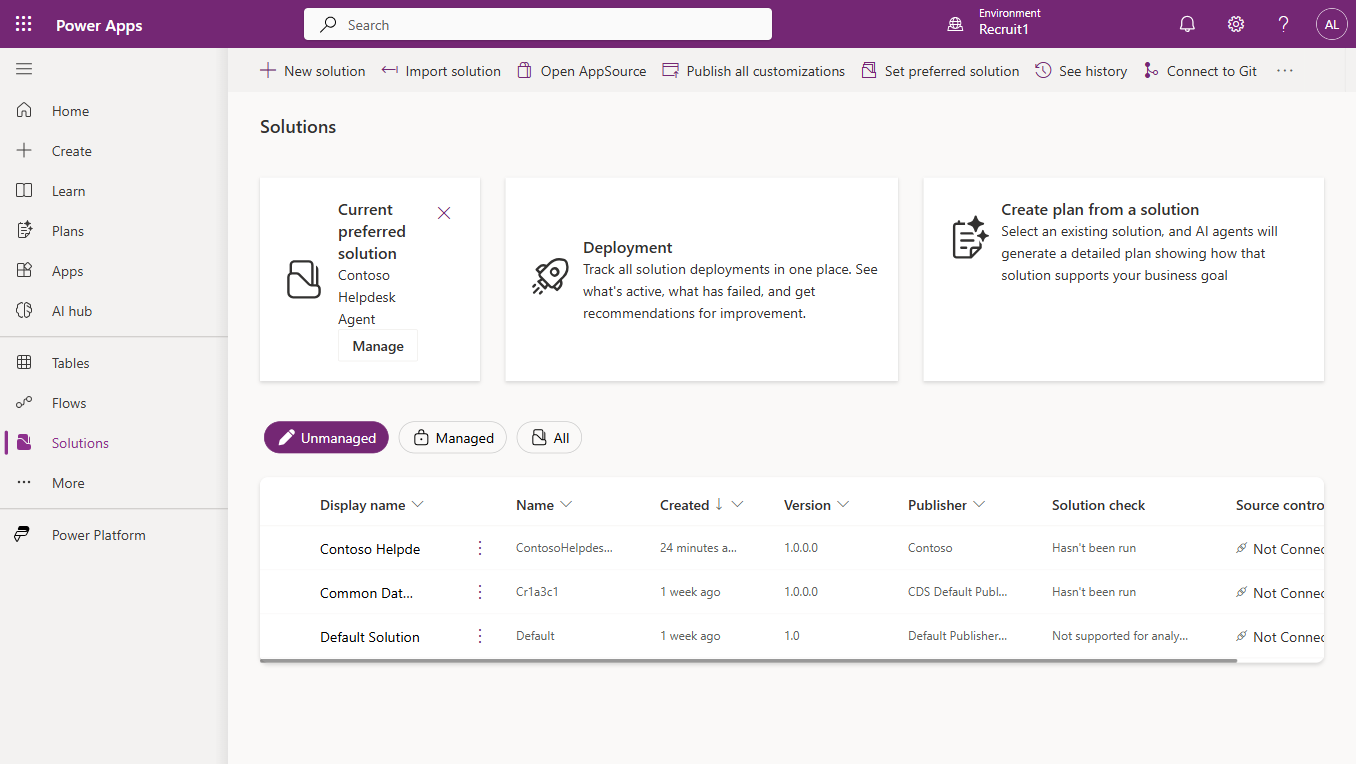
Note: If you don't see any solutions yet, that's okay — you're about to create one.
Step 3: Create a New Publisher
- In the Solutions page, select + New solution → in the dialog, open the Publisher dropdown → select + New publisher
- (Alternatively, use Settings ⚙️ → Advanced settings → Customizations → Publishers.)
- In the New publisher dialog, enter the following:
| Field | Value |
|---|---|
| Display Name | Contoso |
| Name | contoso (auto-generated from Display Name) |
| Prefix | contoso |
| Choice Value Prefix | 10000 (or leave default) |
| Description | Publisher for Contoso training solutions |
Why the prefix matters: The prefix (e.g.,
contoso) is prepended to all solution components. For example, if you create a Dataverse table, it becomescontoso_tablename. This prevents naming conflicts across solutions.
- Select Save (or Save and Close)
✅ Checkpoint: You now have a publisher called Contoso with the prefix contoso.
🧪 Lab 4.2: Create a New Solution
Now that you have a publisher, create the solution for this course.
Step 1: Create the Solution
- In the Solutions page, select + New solution
- In the New solution dialog, enter:
| Field | Value |
|---|---|
| Display Name | Contoso Helpdesk Agent |
| Name | ContosoHelpdeskAgent (auto-generated) |
| Publisher | Select Contoso from the dropdown |
| Version | 1.0.0.0 (default is fine) |
| Description | Solution for Bit, the Contoso IT Helpdesk Agent, and related components |
- Select Create
- The solution is created and you land on the solution details page
✅ Checkpoint: You have a solution called Contoso Helpdesk Agent owned by the Contoso publisher.
Step 2: Explore the Solution
On the solution details page, you'll see:
- Overview — summary of the solution
- Objects — lists all components inside this solution (currently empty)
- History — tracks changes and versions
Right now, the solution is empty. As you build Bit, workflows, and other components, they'll appear here.
🧪 Lab 4.3: Set the Preferred Solution in Copilot Studio
To ensure Bit and all your future components are automatically added to the Contoso Helpdesk Agent solution, set it as the preferred solution.
Step 1: Open Copilot Studio
- Go to https://copilotstudio.microsoft.com
- Sign in with your M365 account, and confirm you're in the new experience and the right environment
Step 2: Set the Preferred Solution
You can set the preferred solution in either place:
- Environment-wide: Settings (⚙️) → Advanced (or Environment) → locate Preferred solution → select Contoso Helpdesk Agent.
- Per agent (up front): right after you create Bit (Module 06), open the agent's Settings and confirm/choose Contoso Helpdesk Agent as the solution.
- Select Save or Apply
Note: The exact location of "Preferred solution" may vary. Look under Settings → Advanced, Settings → Environment, or use the Settings search box and type "Preferred solution."
✅ Checkpoint: The Contoso Helpdesk Agent solution is now the preferred solution.
What This Means
From now on, when you create an agent, workflow, or other component:
- It's automatically added to the Contoso Helpdesk Agent solution
- You don't need to manually assign it later
- All related components stay organized in one place
Best practice: Always set a preferred solution at the start of a project. This prevents "orphaned" components scattered across the environment.
✅ How to Verify Components Are in the Solution
After you create Bit in Module 06, come back to the Power Apps maker portal to verify it's in the solution:
- Go to https://make.powerapps.com
- Select Solutions
- Select Contoso Helpdesk Agent
- In the Objects list, you should see:
- Copilot → Bit (your agent)
- Workflows / Cloud flows → any workflows you create
- Connection references → connectors you use
📚 Understanding Solution Layers
When you edit a solution component (e.g., update Bit's instructions), Power Platform creates a layer. Layers track who changed what and when.
Why this matters:
- Multiple people can work on the same solution
- You can see the history of changes
- If something breaks, you can identify which layer introduced the issue
You can view layers:
- In the solution, select a component (e.g., your agent)
- Select Advanced → See solution layers
- You'll see a list of changes (active layer, base layer, etc.)
For this course, you don't need to manage layers — just know they exist for collaboration and troubleshooting.
📦 Exporting and Importing Solutions
Although you won't do this in the course, here's the high-level process for moving solutions between environments:
Export (from Dev)
- Go to Solutions in Power Apps
- Select the solution
- Select Export
- Choose Managed or Unmanaged
- Download the .zip file
Import (to Test/Prod)
- In the target environment, go to Solutions
- Select Import
- Upload the .zip file
- Follow the prompts to map connections and environment variables
- Select Import
This is the foundation of Application Lifecycle Management (ALM) for Power Platform.
⭐ Solution Best Practices
- One solution per project — don't mix unrelated agents into one solution
- Set a preferred solution — always configure this before building
- Use descriptive names —
Contoso Helpdesk Agentis better thanSolution1 - Version your solutions — increment the version with each release (1.0.0.0 → 1.1.0.0)
- Export regularly — back up your work by exporting the solution as a .zip file
- Use a custom publisher — avoid the default publisher (it's shared across all solutions)
🧠 Key Takeaways
- Solutions are containers for Power Platform components (agents, workflows, etc.)
- Publishers provide a namespace (prefix) for solution components
- Preferred solution ensures new components are automatically added to your solution
- Managed solutions are for production; unmanaged solutions are for development
- ALM-ready — solutions enable environment promotion, version control, and team collaboration
🏗️ What You've Built
You now have:
- ✅ A publisher called Contoso with prefix
contoso - ✅ A solution called Contoso Helpdesk Agent
- ✅ Preferred solution set in Copilot Studio so all future work goes into this solution
From this point forward, every component you create — starting with Bit — will be neatly organized in the Contoso Helpdesk Agent solution.
⏭️ Next Steps
In Module 05: Using Pre-Built Agents, you'll explore agent templates that give you a head start on common scenarios.
Then in Module 06: Build the Contoso Helpdesk Agent, you'll create Bit from scratch — and he'll automatically be added to your solution.
Course Navigation: ← Module 03 | Course Index | Next: Module 05 →